

So you’ve finally put together an EDC you’re proud of. Your bases are covered, you’ve found your favorite gear, and now you’re ready to share it with the world. All that’s left is taking a photo that does your carry justice. If you’ve tried and every attempt ends up looking like this somehow, this guide should help. You might want to chalk it up to just having a bad camera, but with a few easy tips, you can drastically improve the quality of your photos with the equipment you already have on hand.
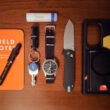
Here are two photos of the same EDC—one taken with an iPhone 6s, the other with a $3,500 DSLR setup. Can you tell the difference?


Not so easy, is it? The DSLR shot’s up top, and the phone pic is on the bottom. Here’s the secret: it’s all in the setup. Keep these tips in mind before snapping your next EDC submission and you’ll be getting double digit Likes in no time. Pick up your best camera or your phone (don’t worry if it’s not in the photo, your phone case makes a great stand-in), and follow these steps:
1. Let There Be Light: Head for the Nearest Window

Lighting is probably the most important part of taking a good photo. Smartphones are much more capable in bright light than they are in the dark. When your photo isn’t properly lit, you may encounter slower shutter speeds (blurry photos), high ISO settings (super grainy photos), and low depth of field (some things in focus, others aren’t). It’s much easier to avoid the nitty gritty camera setting talk, so start off by finding a well lit area. Mother nature tends to provide some of the nicest light, so set up on a table near a window, or outdoors in indirect sunlight. If your only free time for a photoshoot is after the sun has set, grab a lamp (or two) with a soft white shade or an affordable diffused LED light panel.
2. Make Your Gear Pop With the Right Background

Look for something with high contrast to make your gear stand out. If you’ve got all-black-everything, use a lighter backdrop. If you’re rocking a more traditional carry with wood and brass, try laying it out on something other than a woodgrain background. In a perfect world, you’ll have a nice, flat surface to work with that’s right by a natural window light, but we know that’s not always the case. If you have a wood cutting board (I recommend this one), bring it over by the window to use as both your flat surface and your visual backdrop. Another option that both looks cool and helps you with your knolling (more on that later) is a cutting mat. They’re flexible plastic sheets with a grid printed on them that makes it super easy to get the spacing between items just right. Plus, they add a cool technical look to your gear photos.
3. Show Off That Wear, But Keep It Clean

It doesn’t hurt to clean off your gear. We all love seeing a well-worn wallet, patina’d brass, and a hard-used knife, but the finger prints on your phone screen and blade can go. Snag a few microfiber cloths to keep your gear clean and lookin’ good without scratching it up. Smudges and dirt, even in the background, can be distracting. The goal here is to let your essentials shine.
4. ABK: Always Be Knolling

Did you know there’s actually a name for arranging your gear at neat right angles? It’s called knolling, a term coined by a janitor at a prominent furniture fabrication/design shop in the late 1980s. This can be tough to get just right, but it’s one of the most visually striking ways to present your carry. Here are some quick tips to make it easier: Line everything up at right angles. “Blocky” rectangular objects like wallets and notebooks can help frame the rest of your essentials if you put them in the corners. Try to keep long, narrow objects like pens, flashlights, and open knives running parallel to each other. Round or irregularly shaped things can fill space towards the center of your EDC without throwing off the hard edges you’ve already set. Lastly, space things out evenly so your gear doesn’t look too cramped or not cohesive enough (Editor’s Note: Think of it as real life Tetris, but with much more practical pieces).
5. Get Your Angles Down

Composition is one of the most important yet often overlooked steps in taking a great photo of your EDC. Take the extra minute and line up your shot perfectly. Ensure that you’re looking straight down from the top and leave yourself a little bit of extra room on the sides to crop and straighten the photo later on. Take more than one photo as well. Make small adjustments to angle and perspective as you go, giving yourself options for the best photo later on. Also keep in mind where you’ll be sharing the photo of your everyday carry. Ratios like 1:1 (square) and 4:3 (shown above) tend to look better on both the web and social media. Avoid really wide crops (like 16:9)—they make it harder to see individual items and don’t quite fill the frame as well as the other ratios.
6. Shaky Hands? Beat the Blur with a Tripod

If your photos keep coming out blurry, relax. Take a breath—then hold it. Holding your breath right before you snap a photo helps keep you steady. You can also switch your phone or camera to a “burst” or “continuous” mode if you have it. By taking multiple pictures in one burst, you’re bound to get a good one out of the bunch. If you’re still having trouble, you can always try using a tripod. Smartphones are as capable as ever these days, and getting a little extra help from a tripod can mean the difference between a good photo and a great one. There are plenty of affordable tripods on the market made to support a phone or small camera (this one is solid at $20). Paired with a cradle for the phone, this setup will take the shaky hand factor out of the picture.
7. Elevate Your Photo with Careful Editing

Once you’ve taken a picture you’re happy with, you might be itching to finally post it online and share your EDC with the world. Before you do, take a few minutes and import the photo into an editing program to add those final touches. The stock iOS and Android photo apps are a great place to start. Adjust the crop to fill the frame nicely, straighten it out so your knolling wasn’t for naught, and maybe up the contrast and brightness make the photo pop. If you want to take things a step further, give VSCOCam a shot. It’s a free mobile editing software that’s loaded with image adjustment tools and some nice, subtle filters if that’s your thing (our team here loves it). While effects like HDR and filters may seem tempting, they can make your gear harder to see and less natural looking if you overdo it. Remember, the goal is to take a clear photo that realistically shows off your gear, not necessarily a ton of editing effects.
It’s easier than you think to take a quality photo. There’s only one way to find out, and that’s to try it out for yourself! Share your EDC with us and tag #carrysmarter on Instagram (we’re on there too! Follow us at @everydaycarry) to let others see how you did. If you found this guide helpful, make sure to hit the share button. Any good photo tips we might have missed? Share your advice for taking for the perfect shot in the comments below.

